12 KiB
本小节中,我们将集成阿里云的短信发送服务,实现真正意义上的发送验证码到手机。
1. 接入阿里云短信服务
访问阿里云官网 并登陆,在搜索框中搜索关键词:短信发送, 搜索列表中即可看到对应的产品:

点击它即可跳转产品介绍页,如下图所示:
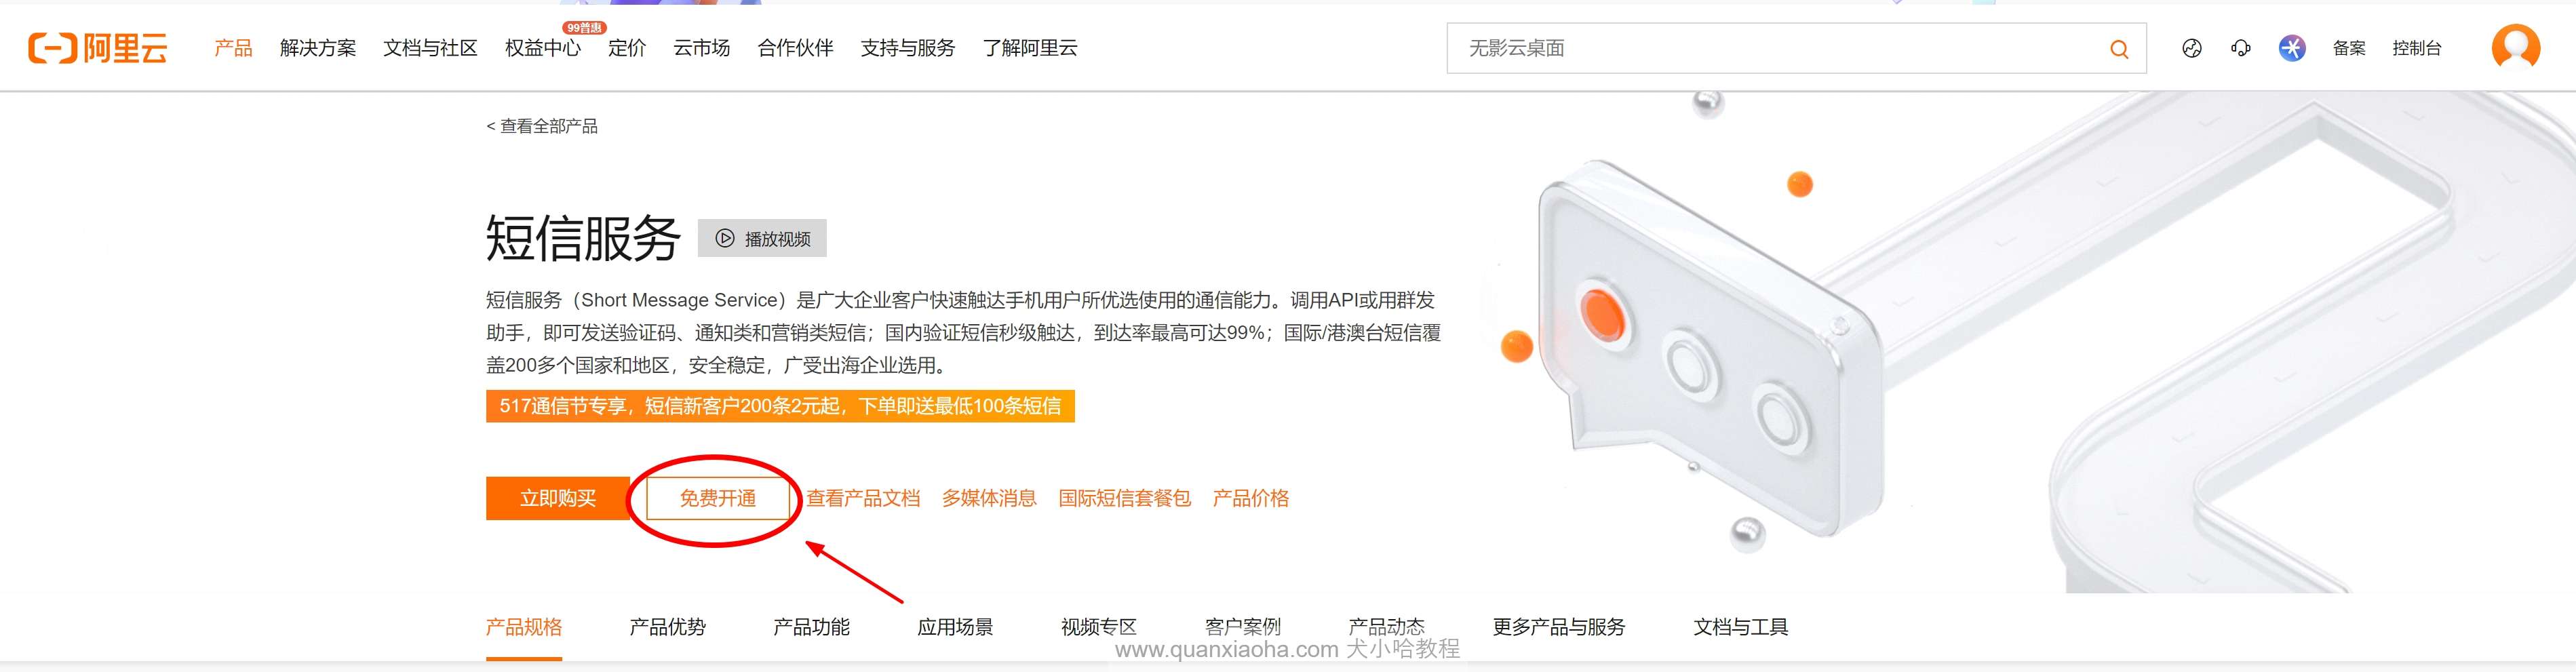
点击免费开通,跳转如下页面:
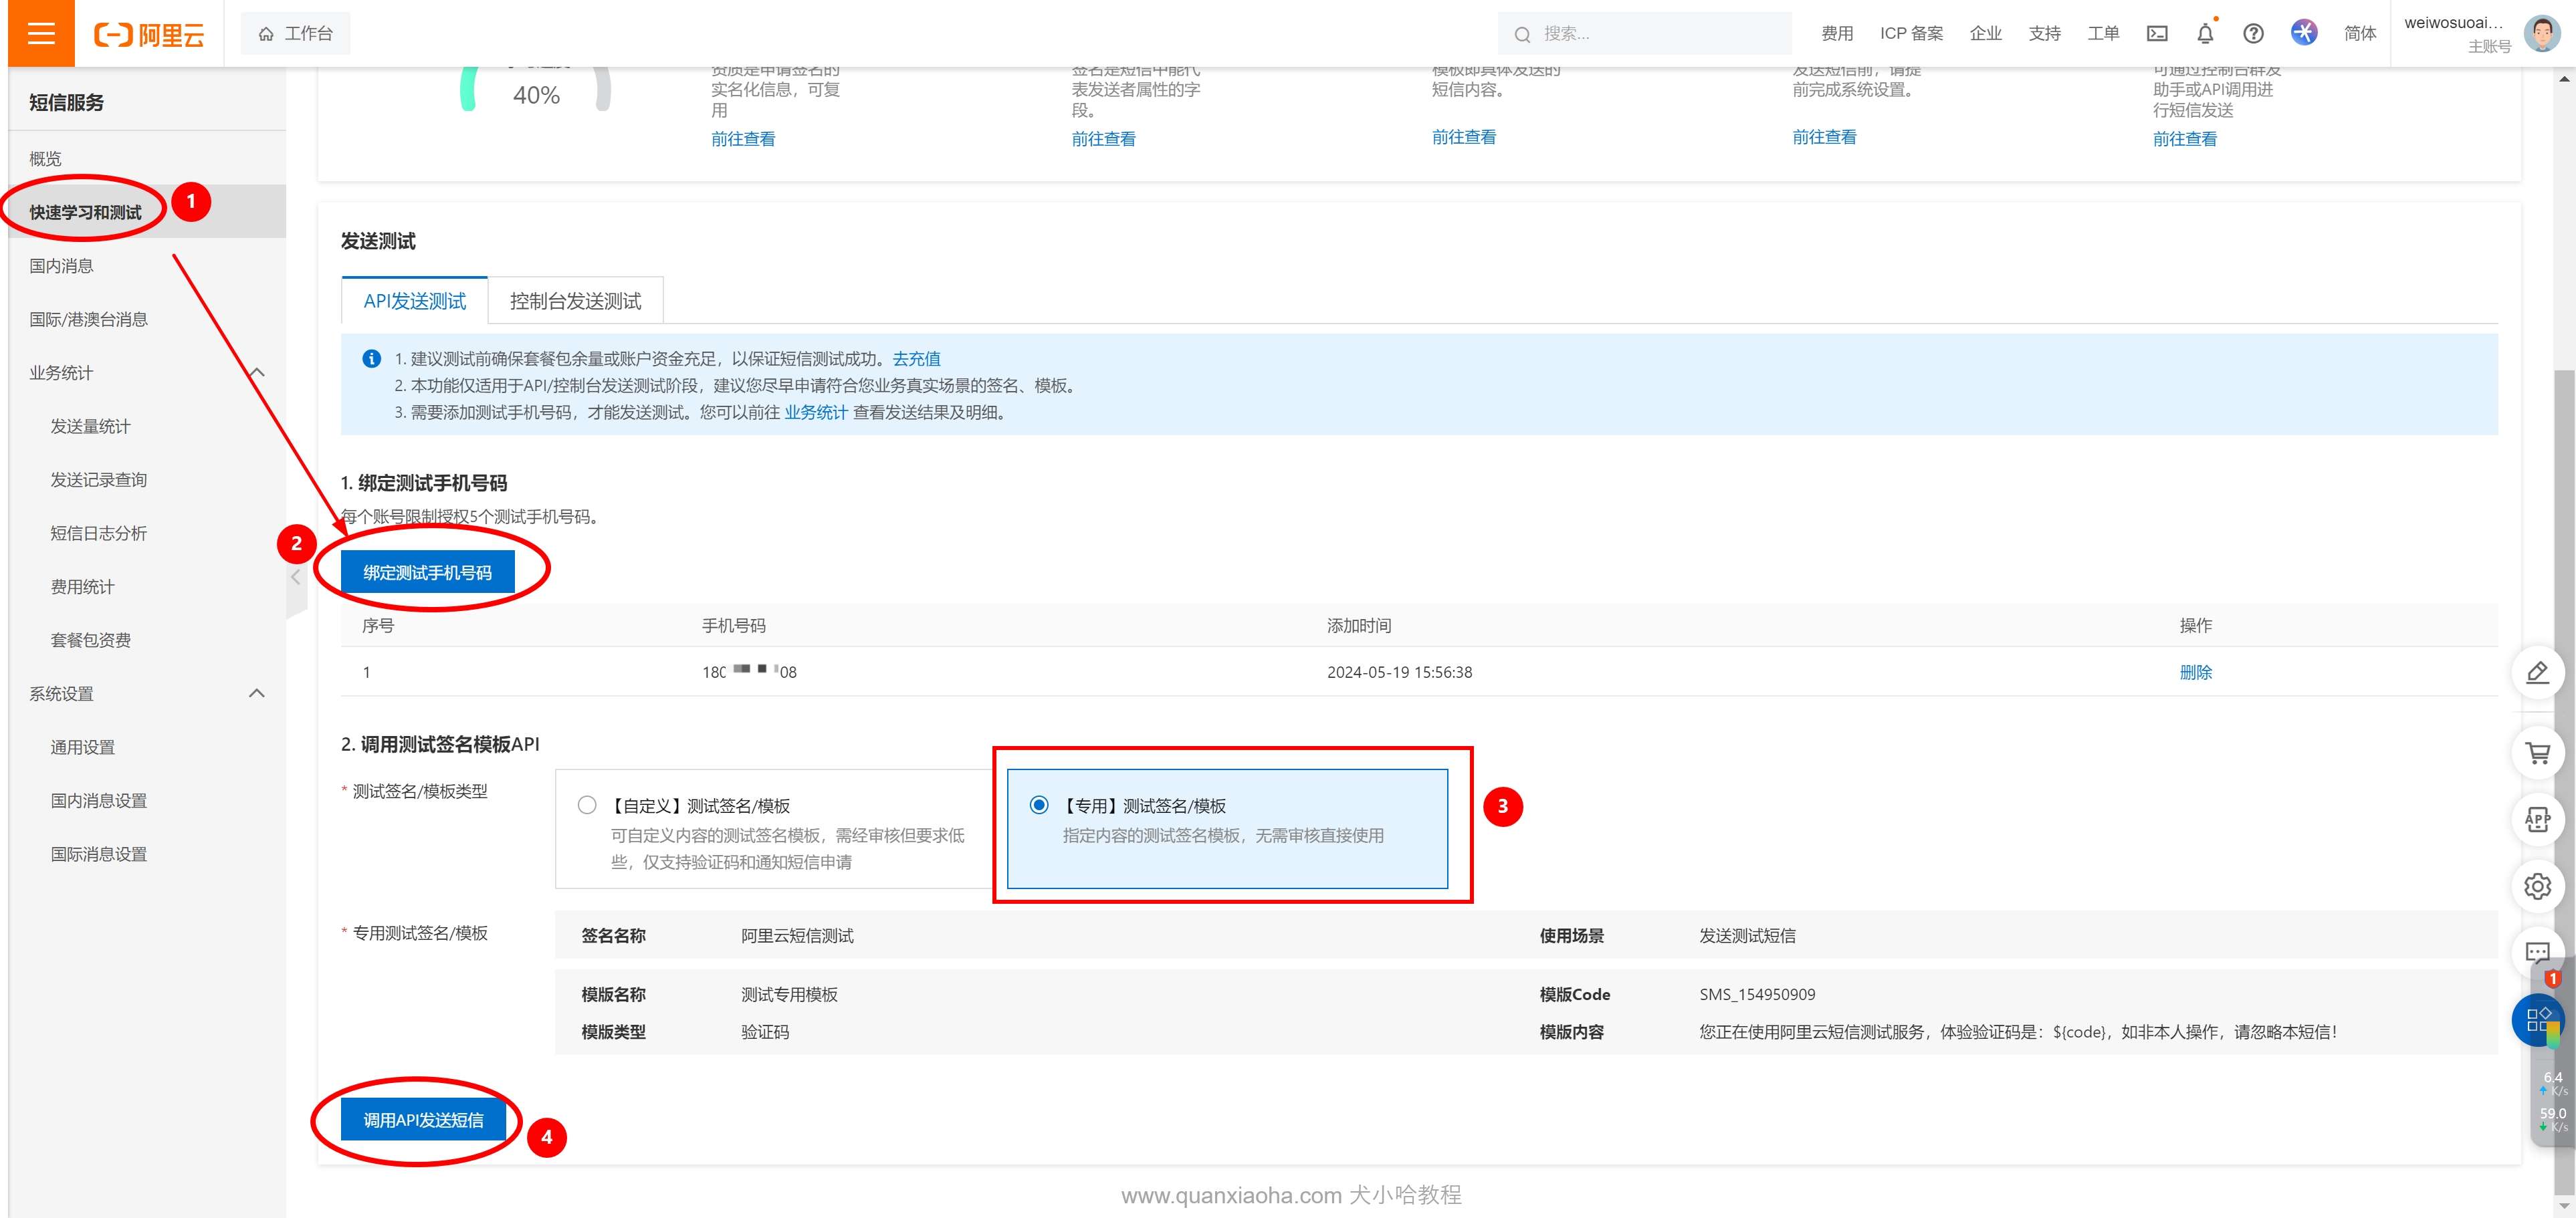
想要正式使用短信发送,需要验证资质、申请签名、申请短信模板等步骤,申请资质这块比较麻烦,就不演示了。本小节直接使用官方提供的测试签名/模板,作个人测试使用,如果想上生产环境时,只需要将签名/模板申请好,后续代码开发阶段是一样的:
①:点击左侧菜单栏的快速学习和测试;
②:绑定测试手机号码,填写的自己的手机号;
③:勾选 【专用】测试签名/模板;
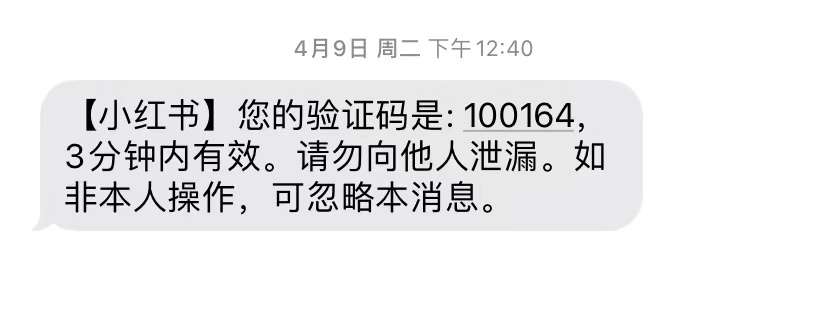
什么是短信模板?
如下图所示,当你在 APP 端点击获取登录验证码后,发送到你手机上的短信格式,其实就是个固定的模板,动态变化的只有验证码部分。在阿里云后台配置好模板内容,验证码部分用一个占位符替代,接入阿里云 API 发送短信时,只需告诉阿里云你的验证码,短信服务会自行替换,并发送短信到手机。
④:点击调用 API 发送短信按钮;
2. 添加阿里云 SDK
页面跳转后,大致如下,可以看到相关语言的接入示例代码,这里选择 Java ,同步发送短信的方式,不需要使用异步 API, 咱们项目中有自己的线程池。接着,点击右上角的 SDK信息:
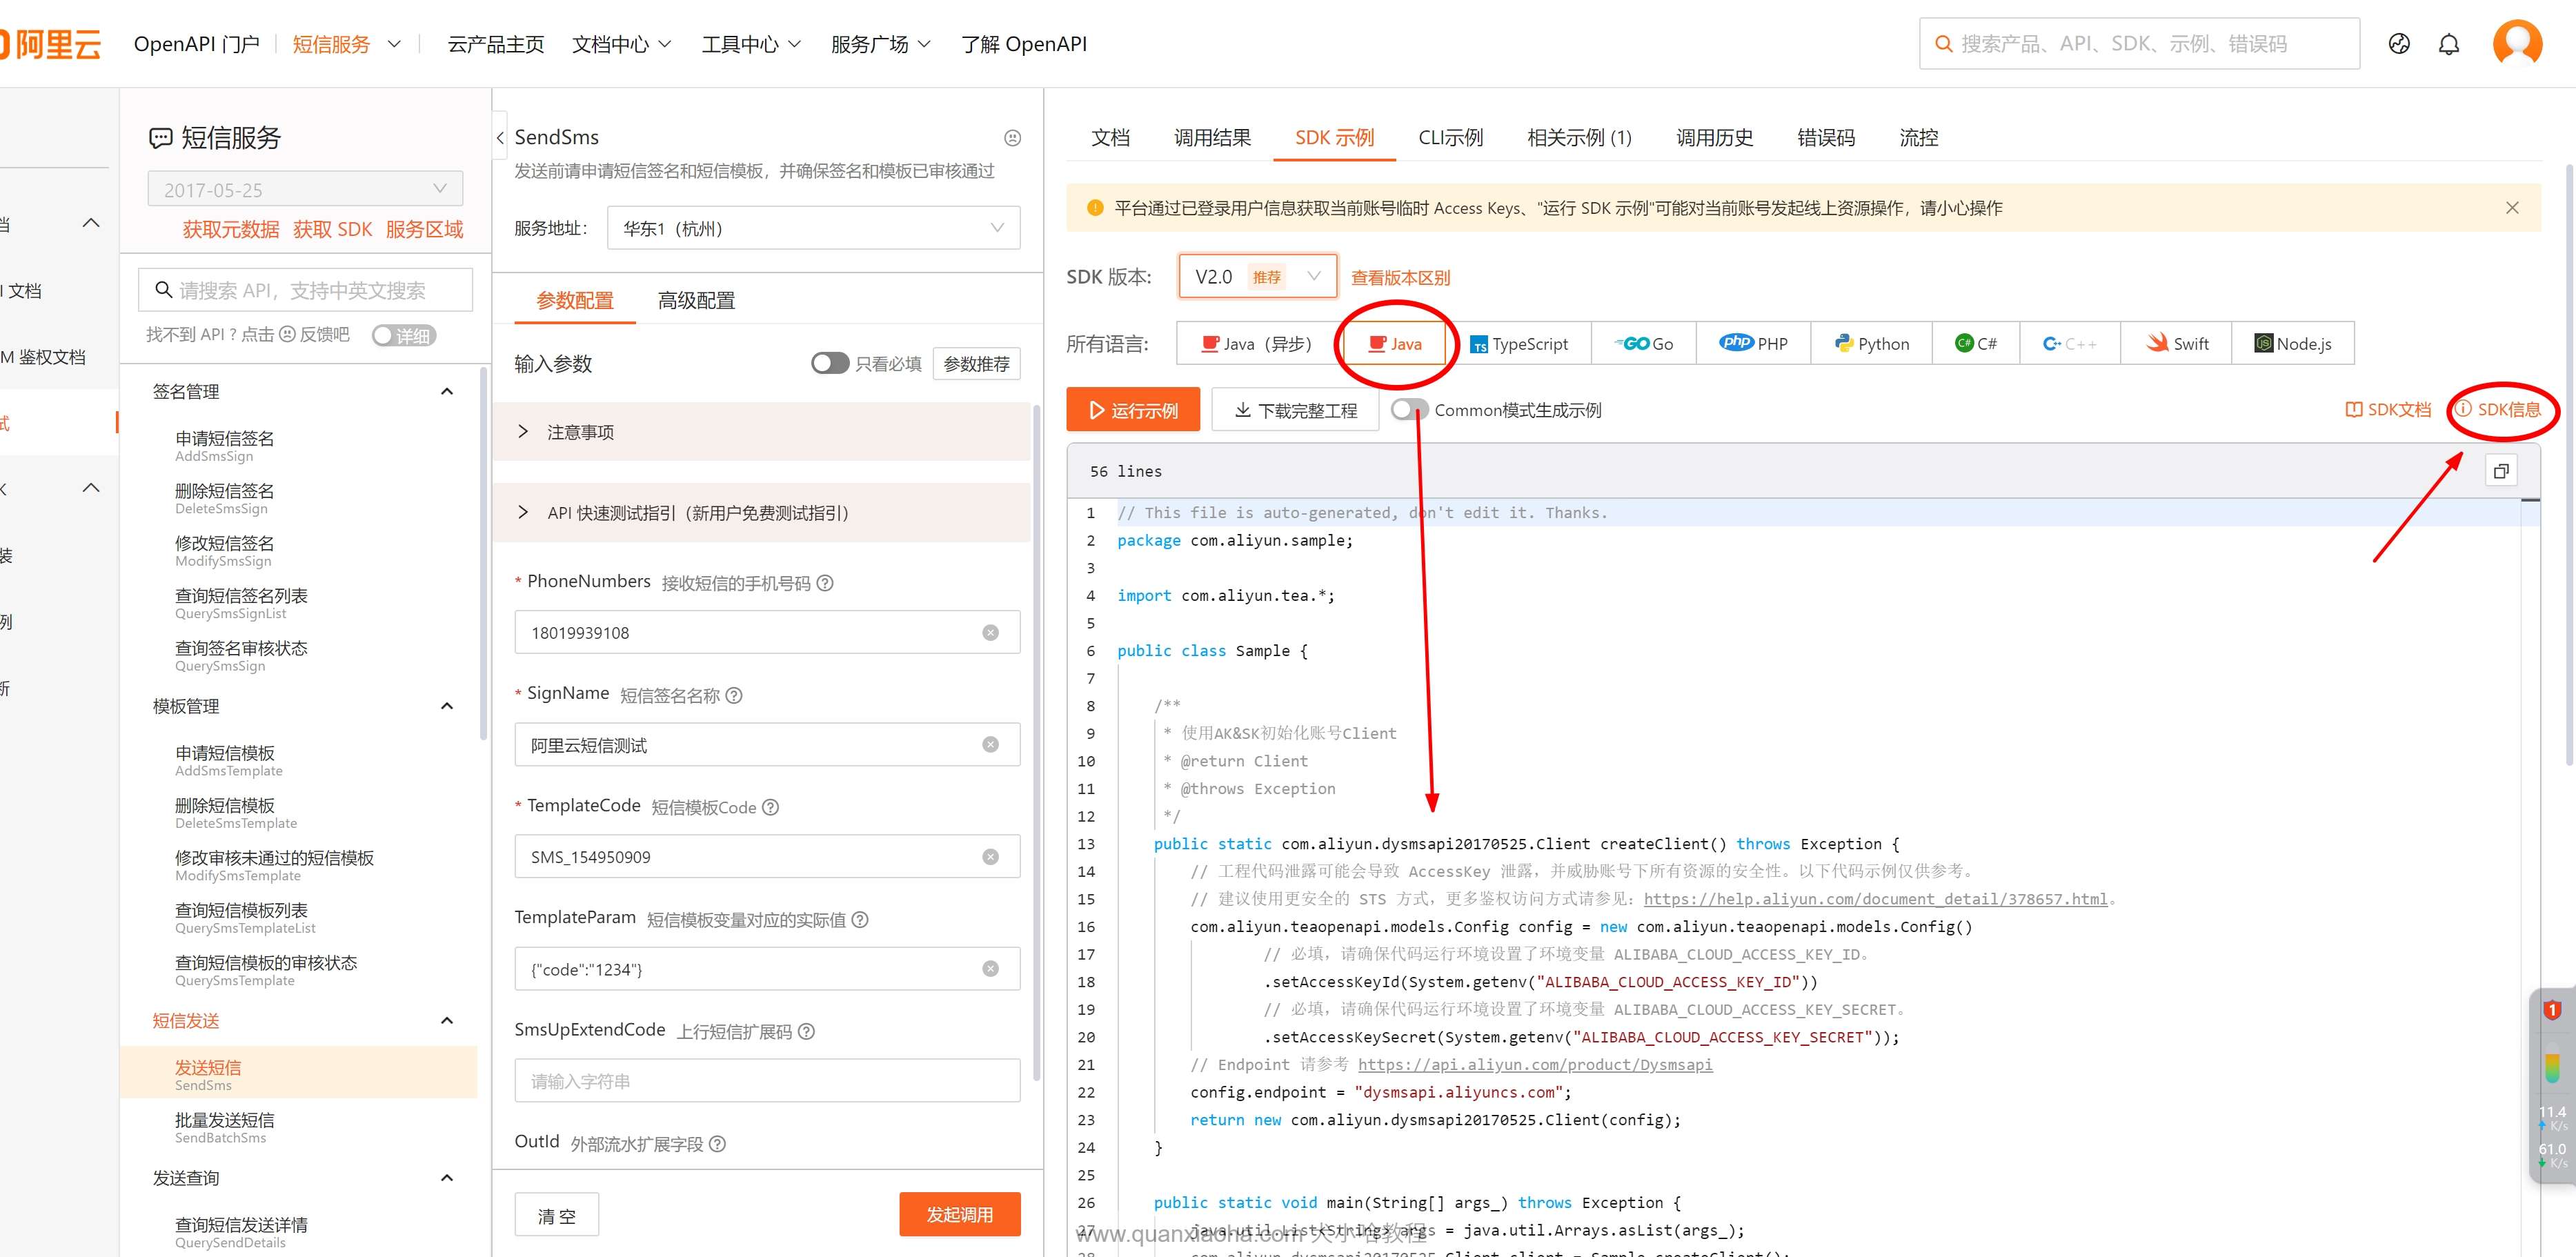
即可看到短信 SDK 对应依赖以及版本号,将其复制出来:
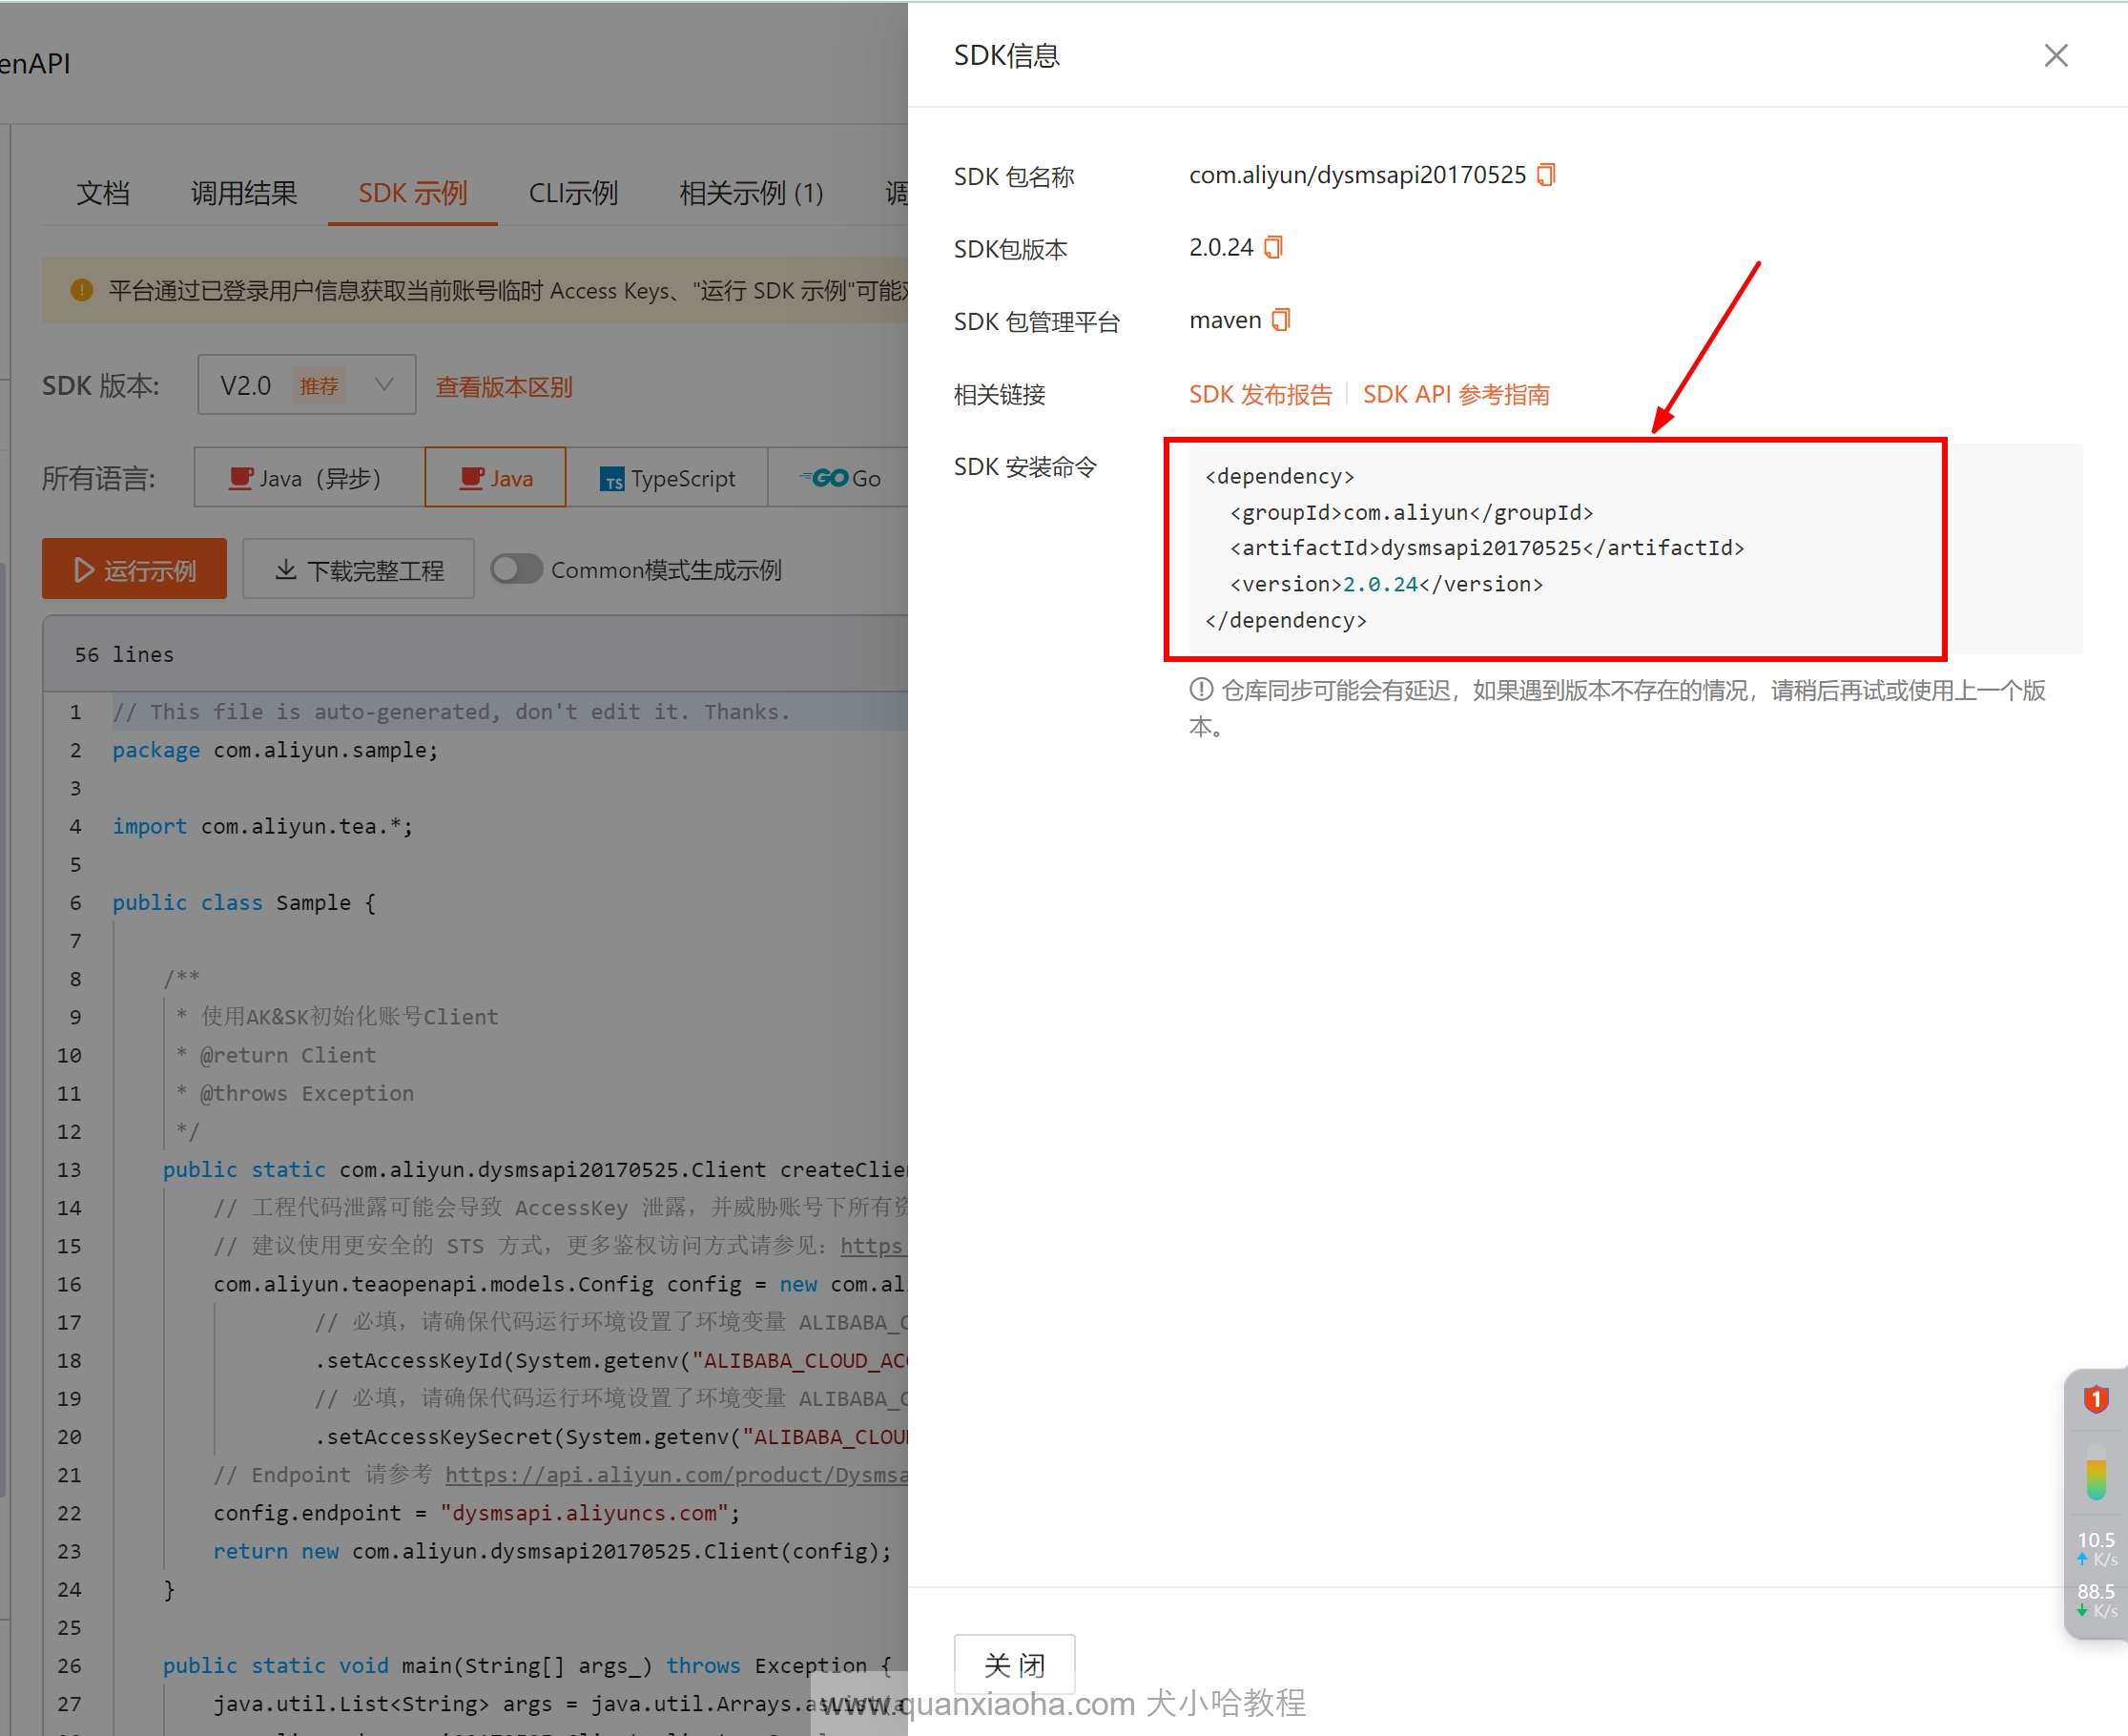
编辑项目的最外层 pom.xml , 添加短信服务 SDK 的版本号以及依赖:
    <properties>
		// 省略...

        <dysmsapi.version>2.0.24</dysmsapi.version>
    </properties>

    <!-- 统一依赖管理 -->
    <dependencyManagement>
        <dependencies>
			// 省略...

            <!-- 阿里云短信发送 -->
            <dependency>
                <groupId>com.aliyun</groupId>
                <artifactId>dysmsapi20170525</artifactId>
                <version>${dysmsapi.version}</version>
            </dependency>
        </dependencies>
    </dependencyManagement>
接着,编辑 xiaohashu-auth 认证服务的 pom.xml , 引入该依赖:
    // 省略...

    <dependencies>
		// 省略...

        <!-- 阿里云短信发送 -->
        <dependency>
            <groupId>com.aliyun</groupId>
            <artifactId>dysmsapi20170525</artifactId>
        </dependency>
    </dependencies>

    // 省略...
最后,别忘了刷新一下 Maven 依赖,将 Jar 包下载到本地仓库中。
3. 添加 AccessKey
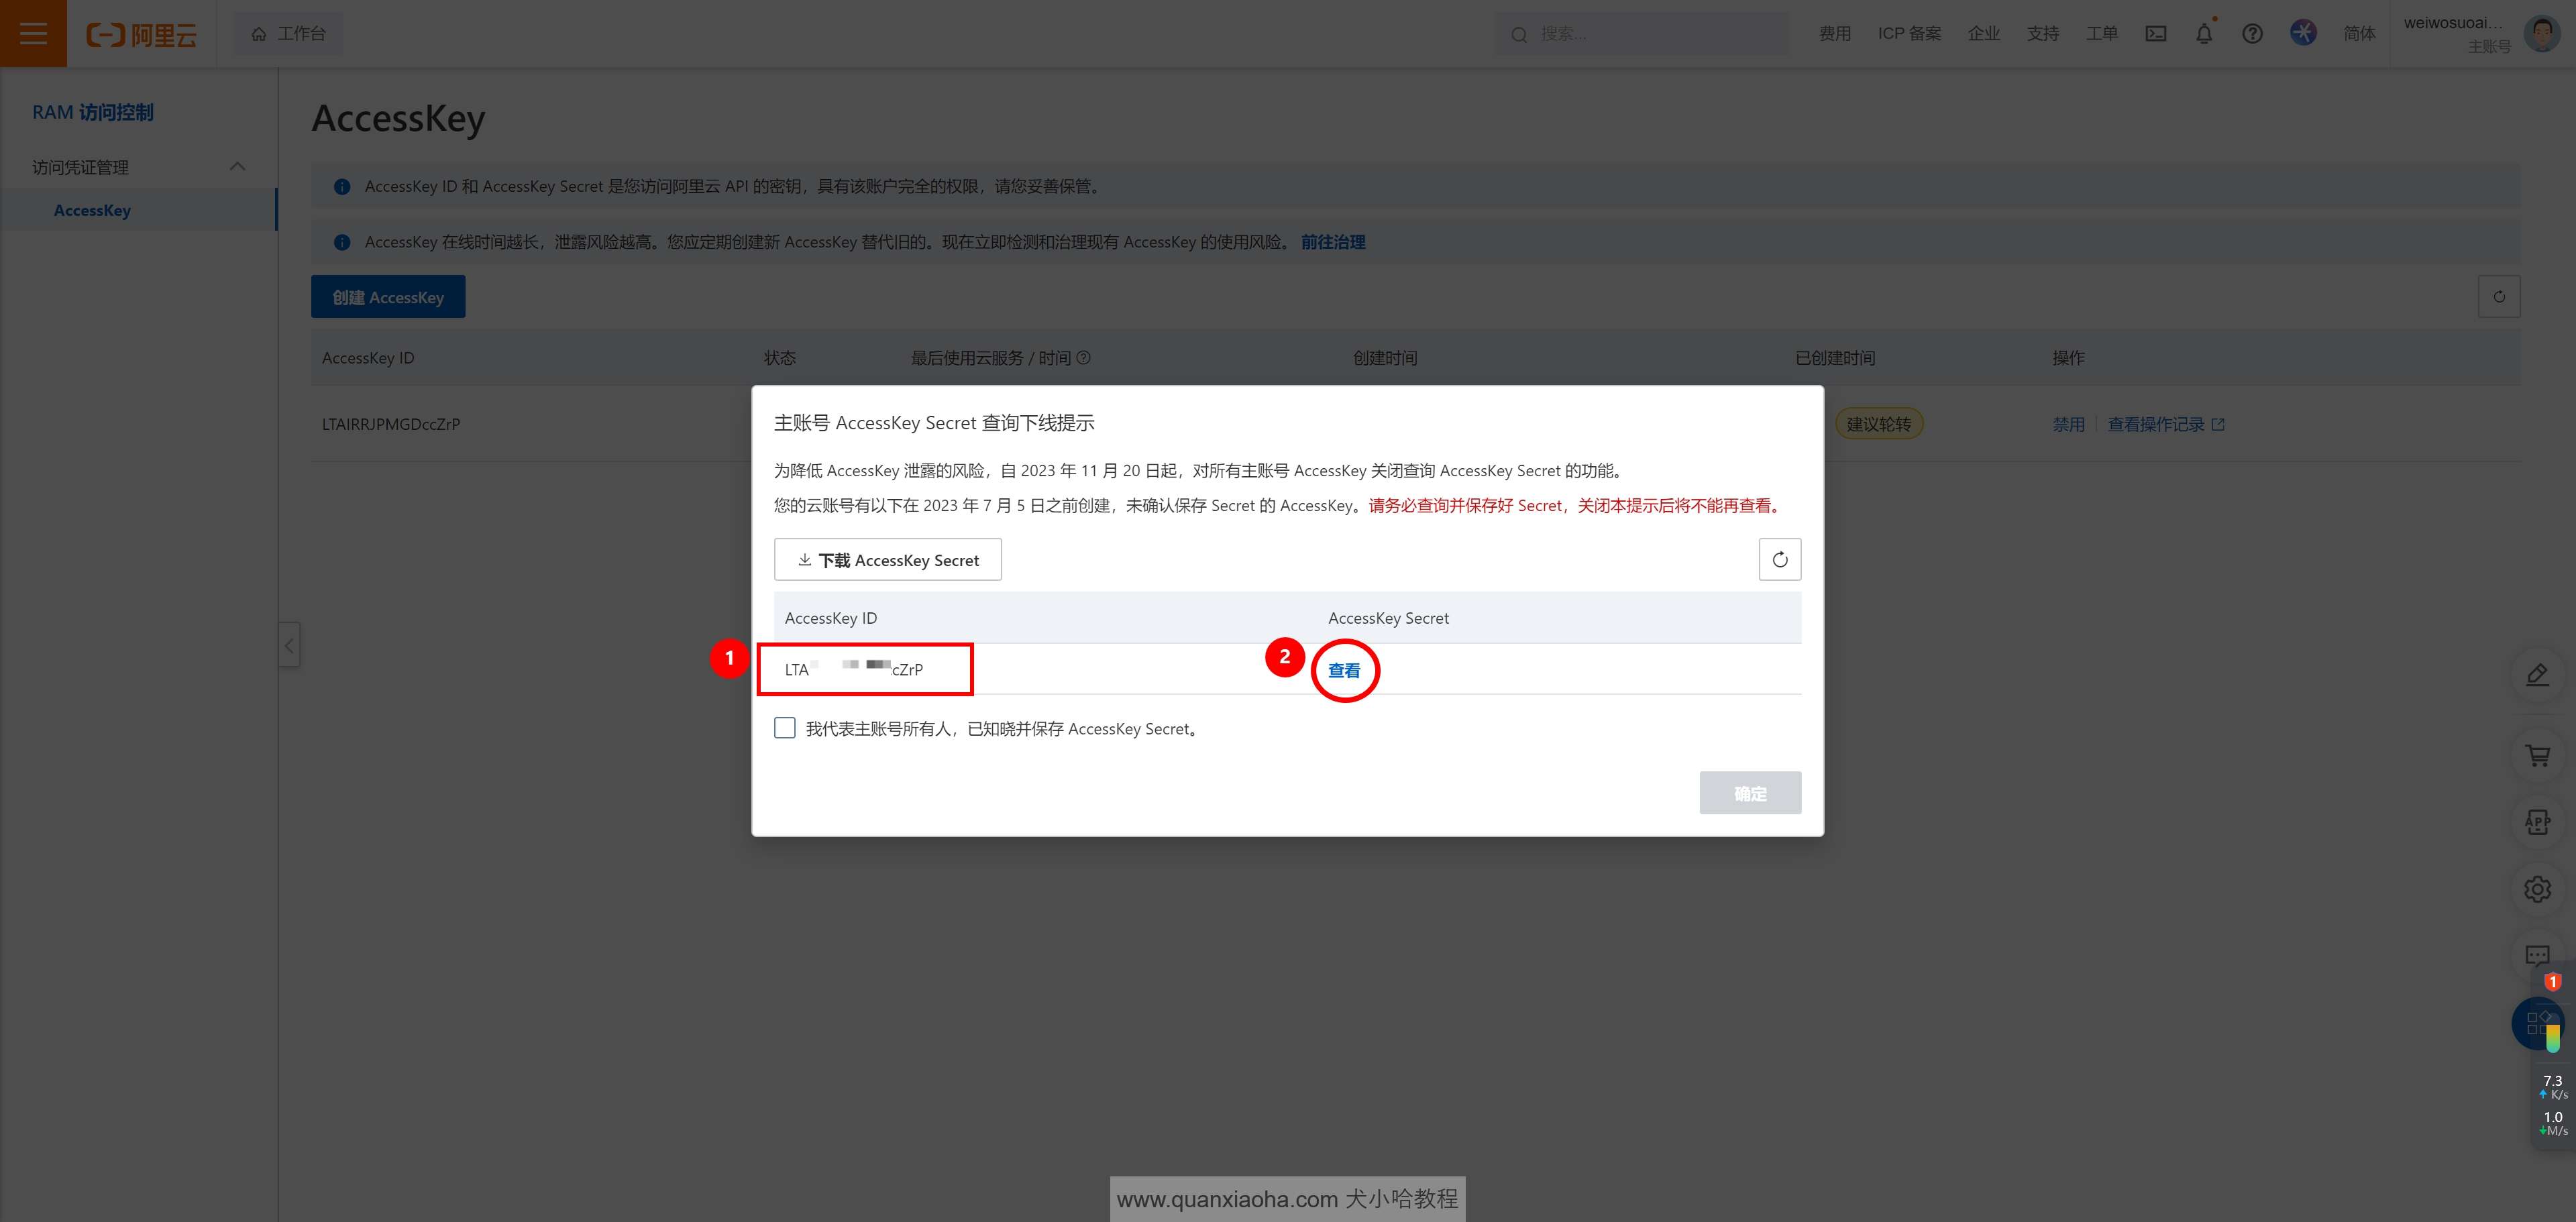
查看发送短信的示例代码,你会发现需要填写阿里云的 Access Key,它是接入凭证。点击回到阿里云首页,将鼠标移动到登录用户的头像上,即可看到 AccessKey 选项,点击即可查看:
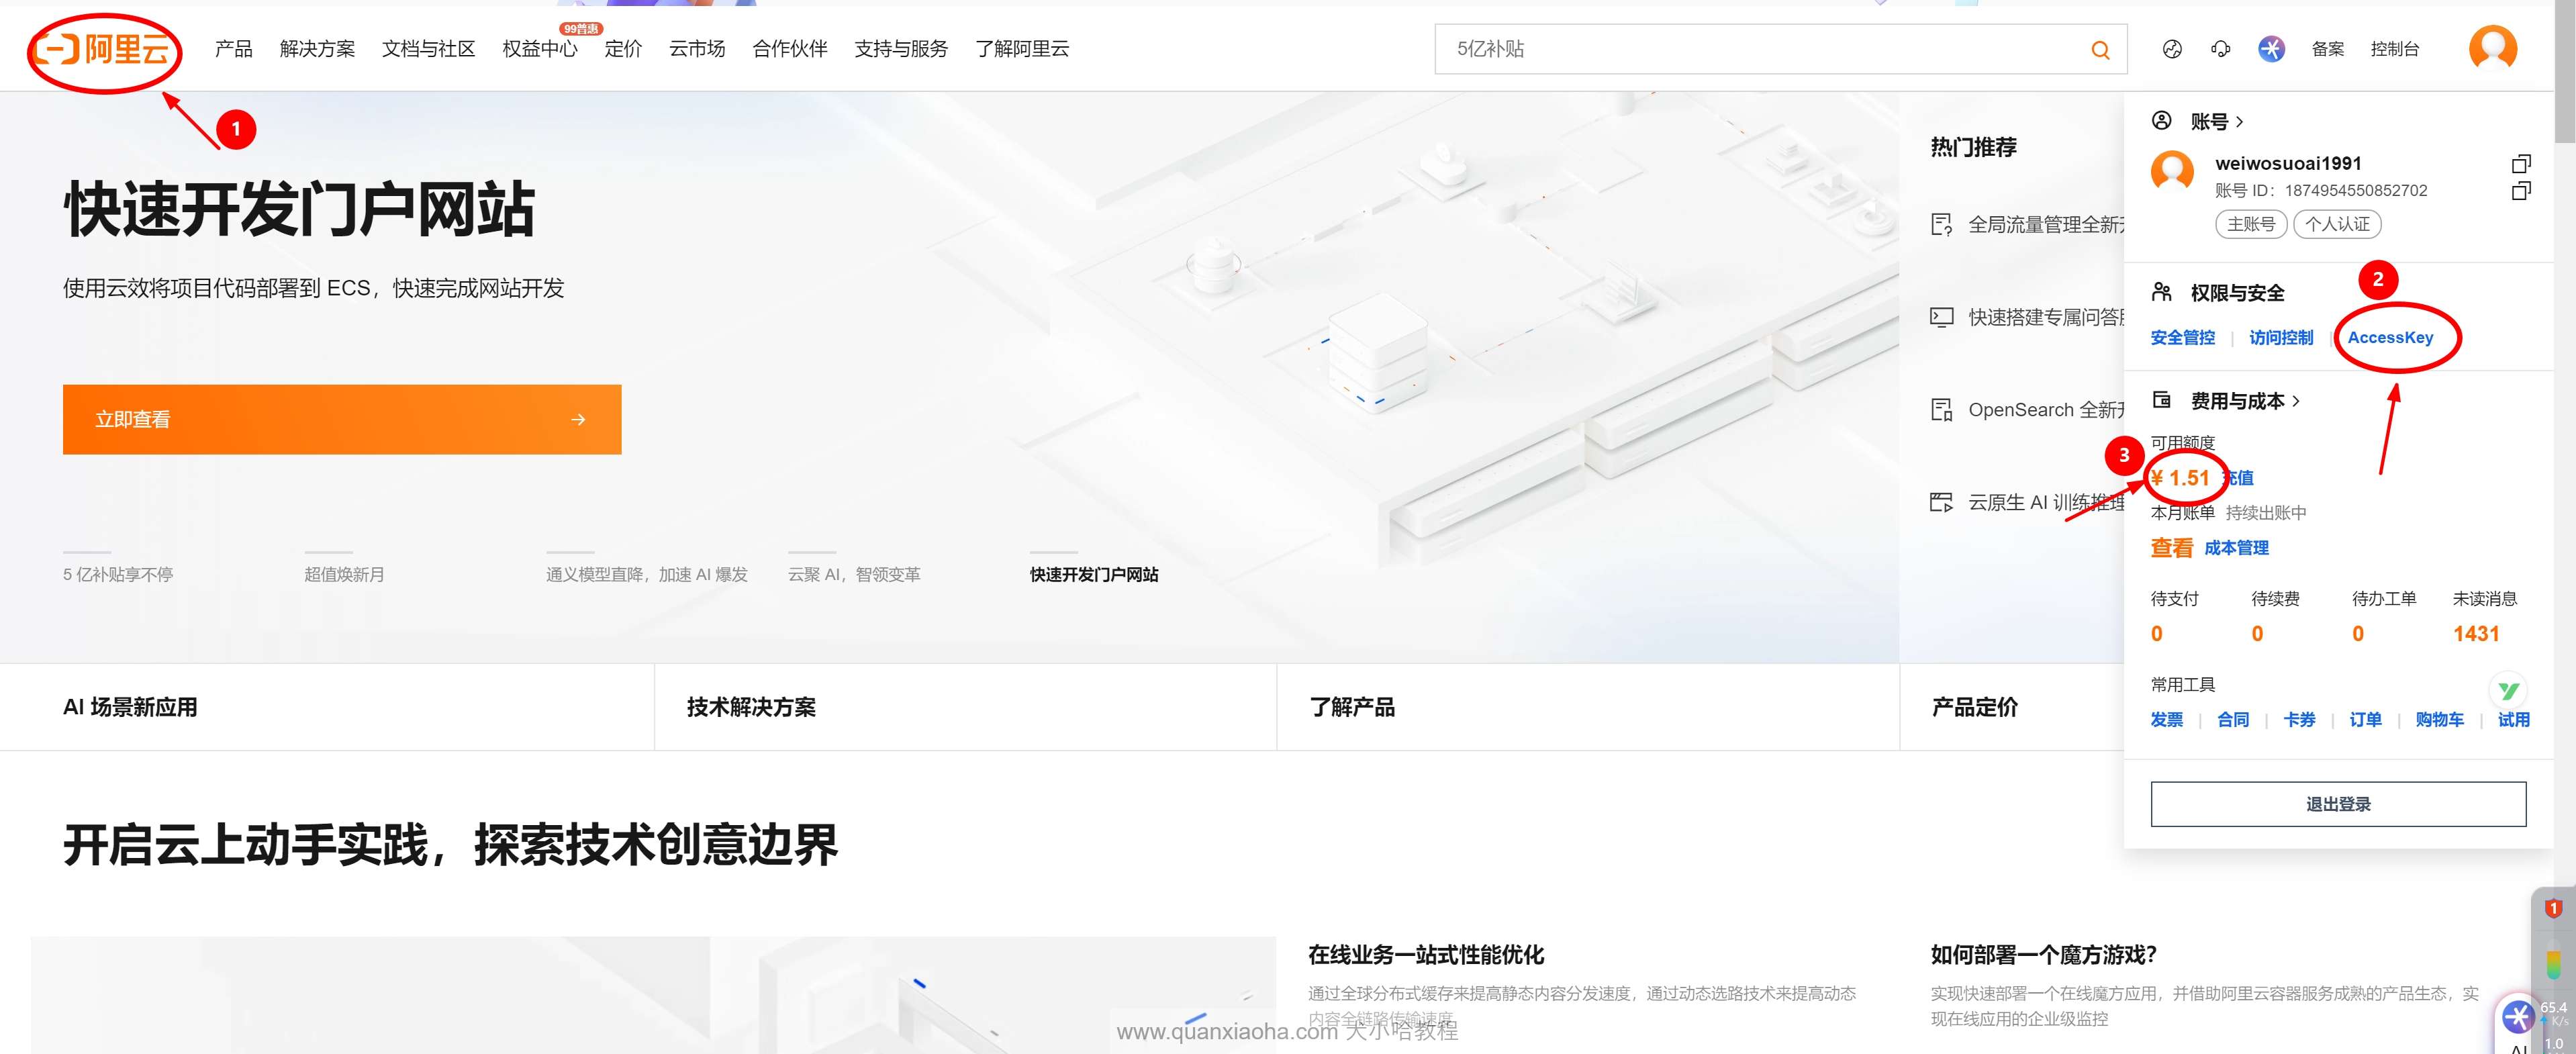
Tip
: 记得给你的账号充值一点钱,比如 1 块钱,因为等会发送测试短信需要费用。
将你的 AccessKeyID 以及 AccessKey Secret 复制出来:
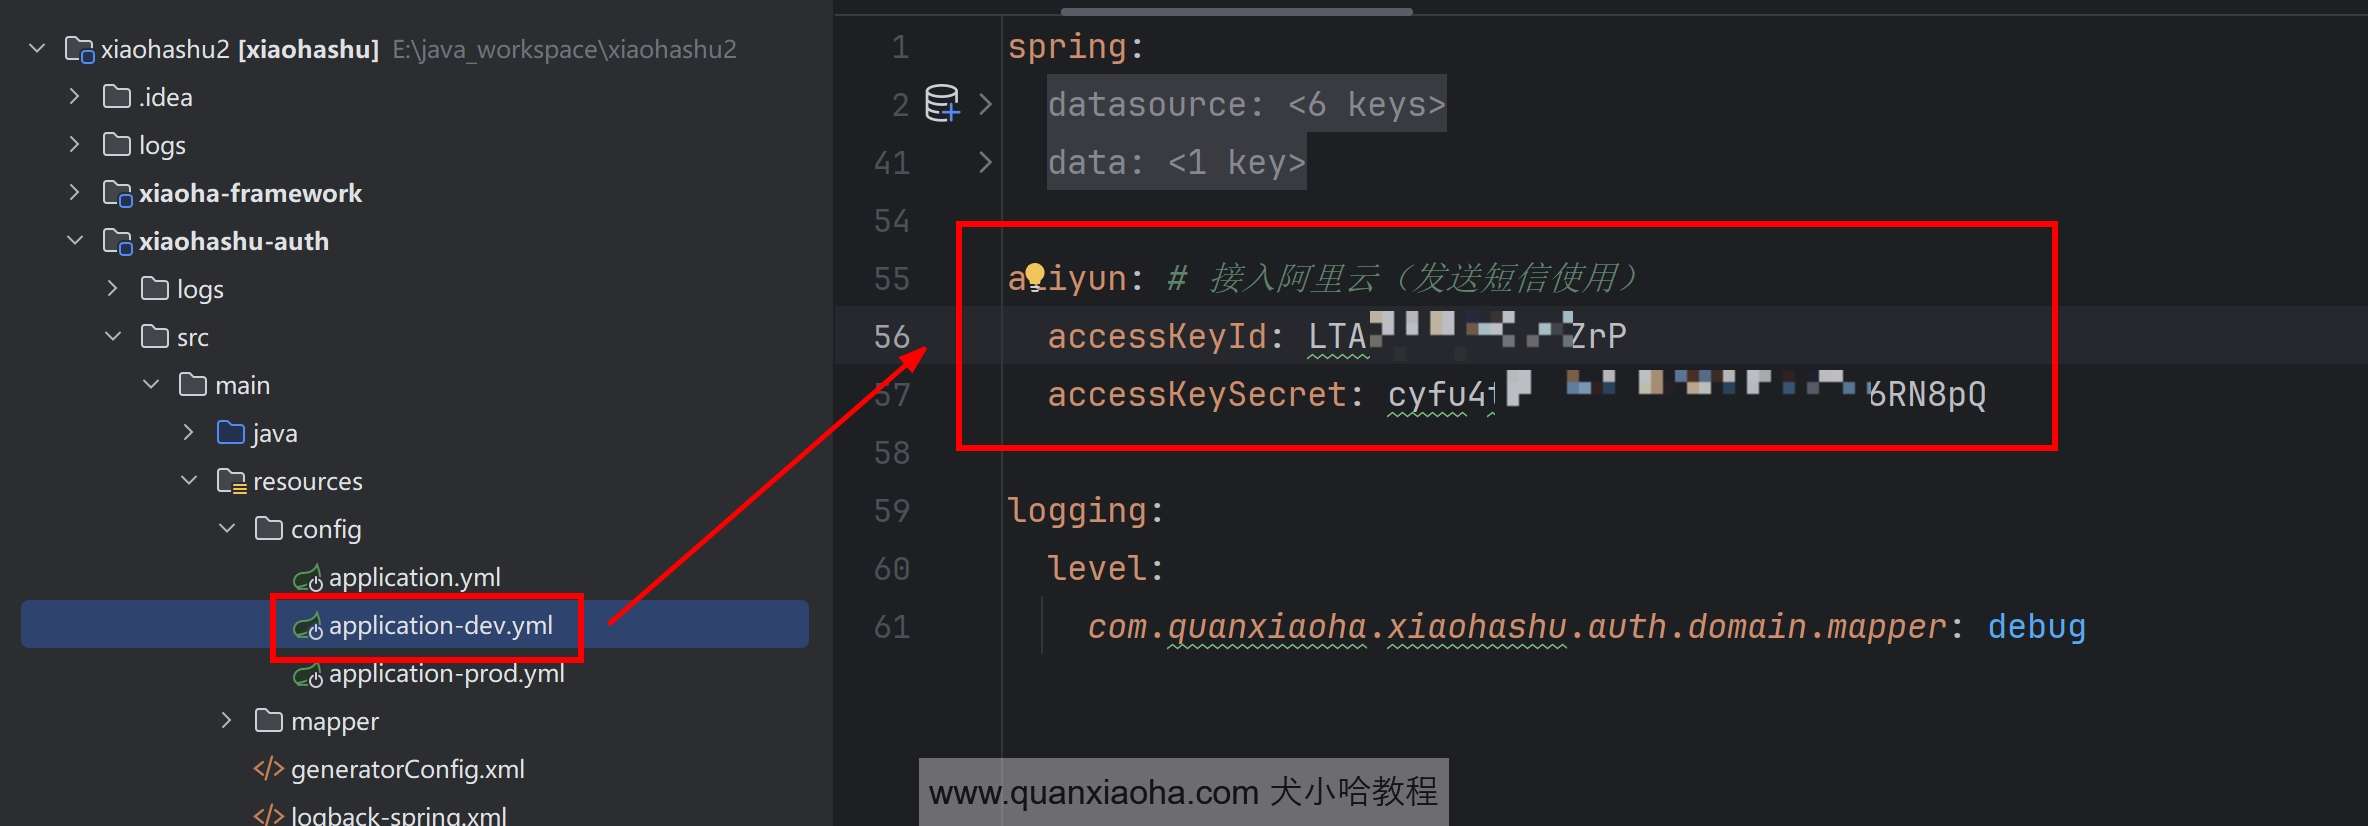
编辑 xiaohashu-auth 认证服务的 application-dev.yml, 为本地开发环境添加如下配置:
aliyun: # 接入阿里云(发送短信使用)
  accessKeyId: xxx # 填写你自己的
  accessKeySecret: xxx # 填写你自己的
4. 封装短信发送工具类
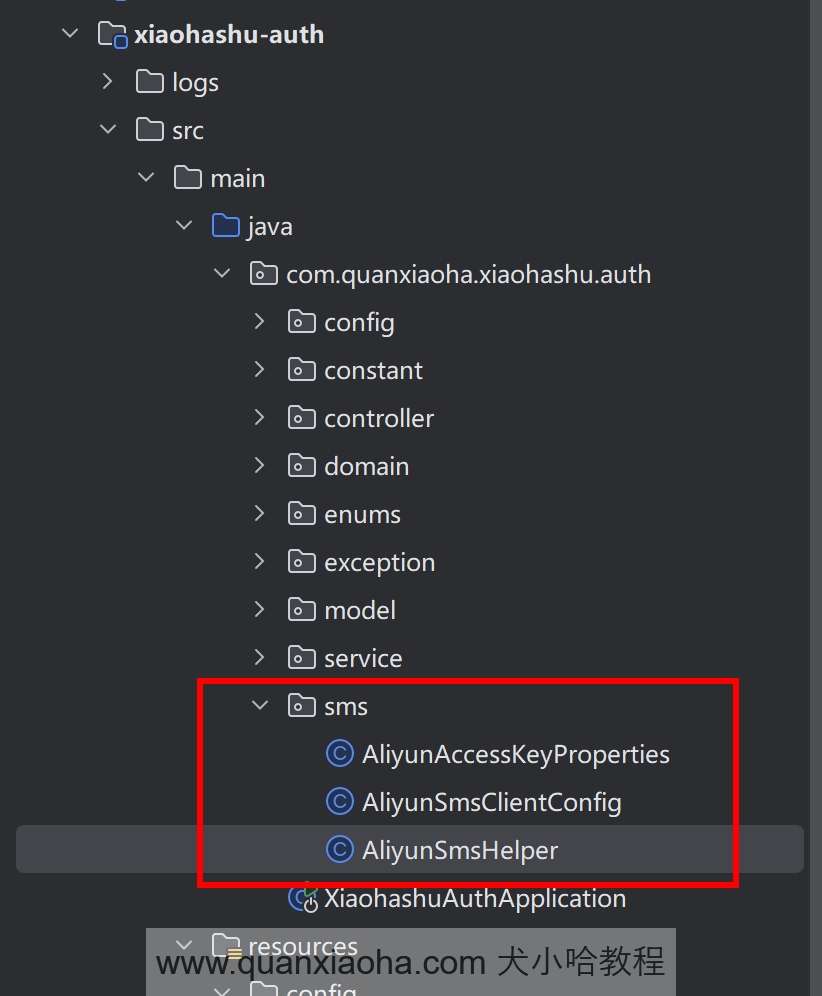
前置工作完成后,开始封装短信发送工具类。创建 /sms 包,用于统一放置短信发送相关的代码。接着,新建 AliyunAccessKeyProperties 配置类,用于接收配置文件中填写的 AccessKey 信息:
package com.quanxiaoha.xiaohashu.auth.sms;

import lombok.Data;
import org.springframework.boot.context.properties.ConfigurationProperties;
import org.springframework.stereotype.Component;

@ConfigurationProperties(prefix = "aliyun")
@Component
@Data
public class AliyunAccessKeyProperties {
    private String accessKeyId;
    private String accessKeySecret;
}
然后,新建 AliyunSmsClientConfig 配置类,用于初始化一个短信发送客户端,注入到 Spring 容器中,以便后续使用:
Tip
: 客户端如何初始化,直接参考官方提供的示例代码即可,这里稍做封装。
package com.quanxiaoha.xiaohashu.auth.sms;

import com.aliyun.dysmsapi20170525.Client;
import com.aliyun.teaopenapi.models.Config;
import jakarta.annotation.Resource;
import lombok.extern.slf4j.Slf4j;
import org.springframework.beans.factory.annotation.Autowired;
import org.springframework.context.annotation.Bean;
import org.springframework.context.annotation.Configuration;

/**
 * @author: 犬小哈
 * @date: 2024/5/24 15:06
 * @version: v1.0.0
 * @description: 短信发送客户端
 **/
@Configuration
@Slf4j
public class AliyunSmsClientConfig {

    @Resource
    private AliyunAccessKeyProperties aliyunAccessKeyProperties;

    @Bean
    public Client smsClient() {
        try {
            Config config = new Config()
                    // 必填
                    .setAccessKeyId(aliyunAccessKeyProperties.getAccessKeyId())
                    // 必填
                    .setAccessKeySecret(aliyunAccessKeyProperties.getAccessKeySecret());

            // Endpoint 请参考 https://api.aliyun.com/product/Dysmsapi
            config.endpoint = "dysmsapi.aliyuncs.com";

            return new Client(config);
        } catch (Exception e) {
            log.error("初始化阿里云短信发送客户端错误: ", e);
            return null;
        }
    }
}
最后,再创建一个 AliyunSmsHelper 短信发送工具类,代码如下:
package com.quanxiaoha.xiaohashu.auth.sms;

import com.aliyun.dysmsapi20170525.Client;
import com.aliyun.dysmsapi20170525.models.SendSmsRequest;
import com.aliyun.dysmsapi20170525.models.SendSmsResponse;
import com.aliyun.teautil.models.RuntimeOptions;
import com.quanxiaoha.framework.common.util.JsonUtils;
import jakarta.annotation.Resource;
import lombok.extern.slf4j.Slf4j;
import org.springframework.stereotype.Component;

/**
 * @author: 犬小哈
 * @date: 2024/5/24 15:05
 * @version: v1.0.0
 * @description: 短信发送工具类
 **/
@Component
@Slf4j
public class AliyunSmsHelper {

    @Resource
    private Client client;

    /**
     * 发送短信
     * @param signName
     * @param templateCode
     * @param phone
     * @param templateParam
     * @return
     */
    public boolean sendMessage(String signName, String templateCode, String phone, String templateParam) {
        SendSmsRequest sendSmsRequest = new SendSmsRequest()
                .setSignName(signName)
                .setTemplateCode(templateCode)
                .setPhoneNumbers(phone)
                .setTemplateParam(templateParam);
        RuntimeOptions runtime = new RuntimeOptions();

        try {
            log.info("==> 开始短信发送, phone: {}, signName: {}, templateCode: {}, templateParam: {}", phone, signName, templateCode, templateParam);

            // 发送短信
            SendSmsResponse response = client.sendSmsWithOptions(sendSmsRequest, runtime);

            log.info("==> 短信发送成功, response: {}", JsonUtils.toJsonString(response));
            return true;
        } catch (Exception error) {
            log.error("==> 短信发送错误: ", error);
            return false;
        }
    }
}
5. 业务层异步发送短信
回到 VerificationCodeServiceImpl 业务实现类中,将之前添加了 todo 注释,还没写完的代码补充上,代码如下:
package com.quanxiaoha.xiaohashu.auth.service.impl;

import cn.hutool.core.util.RandomUtil;
import com.quanxiaoha.framework.common.exception.BizException;
import com.quanxiaoha.framework.common.response.Response;
import com.quanxiaoha.xiaohashu.auth.constant.RedisKeyConstants;
import com.quanxiaoha.xiaohashu.auth.enums.ResponseCodeEnum;
import com.quanxiaoha.xiaohashu.auth.model.vo.verificationcode.SendVerificationCodeReqVO;
import com.quanxiaoha.xiaohashu.auth.service.VerificationCodeService;
import com.quanxiaoha.xiaohashu.auth.sms.AliyunSmsHelper;
import jakarta.annotation.Resource;
import lombok.extern.slf4j.Slf4j;
import org.springframework.data.redis.core.RedisTemplate;
import org.springframework.scheduling.concurrent.ThreadPoolTaskExecutor;
import org.springframework.stereotype.Service;

import java.util.concurrent.TimeUnit;

@Service
@Slf4j
public class VerificationCodeServiceImpl implements VerificationCodeService {

    @Resource
    private RedisTemplate<String, Object> redisTemplate;
    @Resource(name = "taskExecutor")
    private ThreadPoolTaskExecutor threadPoolTaskExecutor;
    @Resource
    private AliyunSmsHelper aliyunSmsHelper;

    /**
     * 发送短信验证码
     *
     * @param sendVerificationCodeReqVO
     * @return
     */
    @Override
    public Response<?> send(SendVerificationCodeReqVO sendVerificationCodeReqVO) {
        // 手机号
        String phone = sendVerificationCodeReqVO.getPhone();

        // 构建验证码 redis key
        String key = RedisKeyConstants.buildVerificationCodeKey(phone);

        // 判断是否已发送验证码
        boolean isSent = redisTemplate.hasKey(key);
        if (isSent) {
            // 若之前发送的验证码未过期,则提示发送频繁
            throw new BizException(ResponseCodeEnum.VERIFICATION_CODE_SEND_FREQUENTLY);
        }

        // 生成 6 位随机数字验证码
        String verificationCode = RandomUtil.randomNumbers(6);

        log.info("==> 手机号: {}, 已生成验证码:【{}】", phone, verificationCode);

        // 调用第三方短信发送服务
        threadPoolTaskExecutor.submit(() -> {
            String signName = "阿里云短信测试";
            String templateCode = "SMS_154950909";
            String templateParam = String.format("{\"code\":\"%s\"}", verificationCode);
            aliyunSmsHelper.sendMessage(signName, templateCode, phone, templateParam);
        });

        // 存储验证码到 redis, 并设置过期时间为 3 分钟
        redisTemplate.opsForValue().set(key, verificationCode, 3, TimeUnit.MINUTES);

        return Response.success();
    }
}
注意:通过
@Resource注解注入ThreadPoolTaskExecutor线程池时,需要指定name = "taskExecutor", 否则可能会报错。
6. 自测一波
OK , 异步发送短信逻辑补充完毕后,重启项目,再次测试获取短信验证码接口,手机号填写阿里云后台绑定的测试手机号:
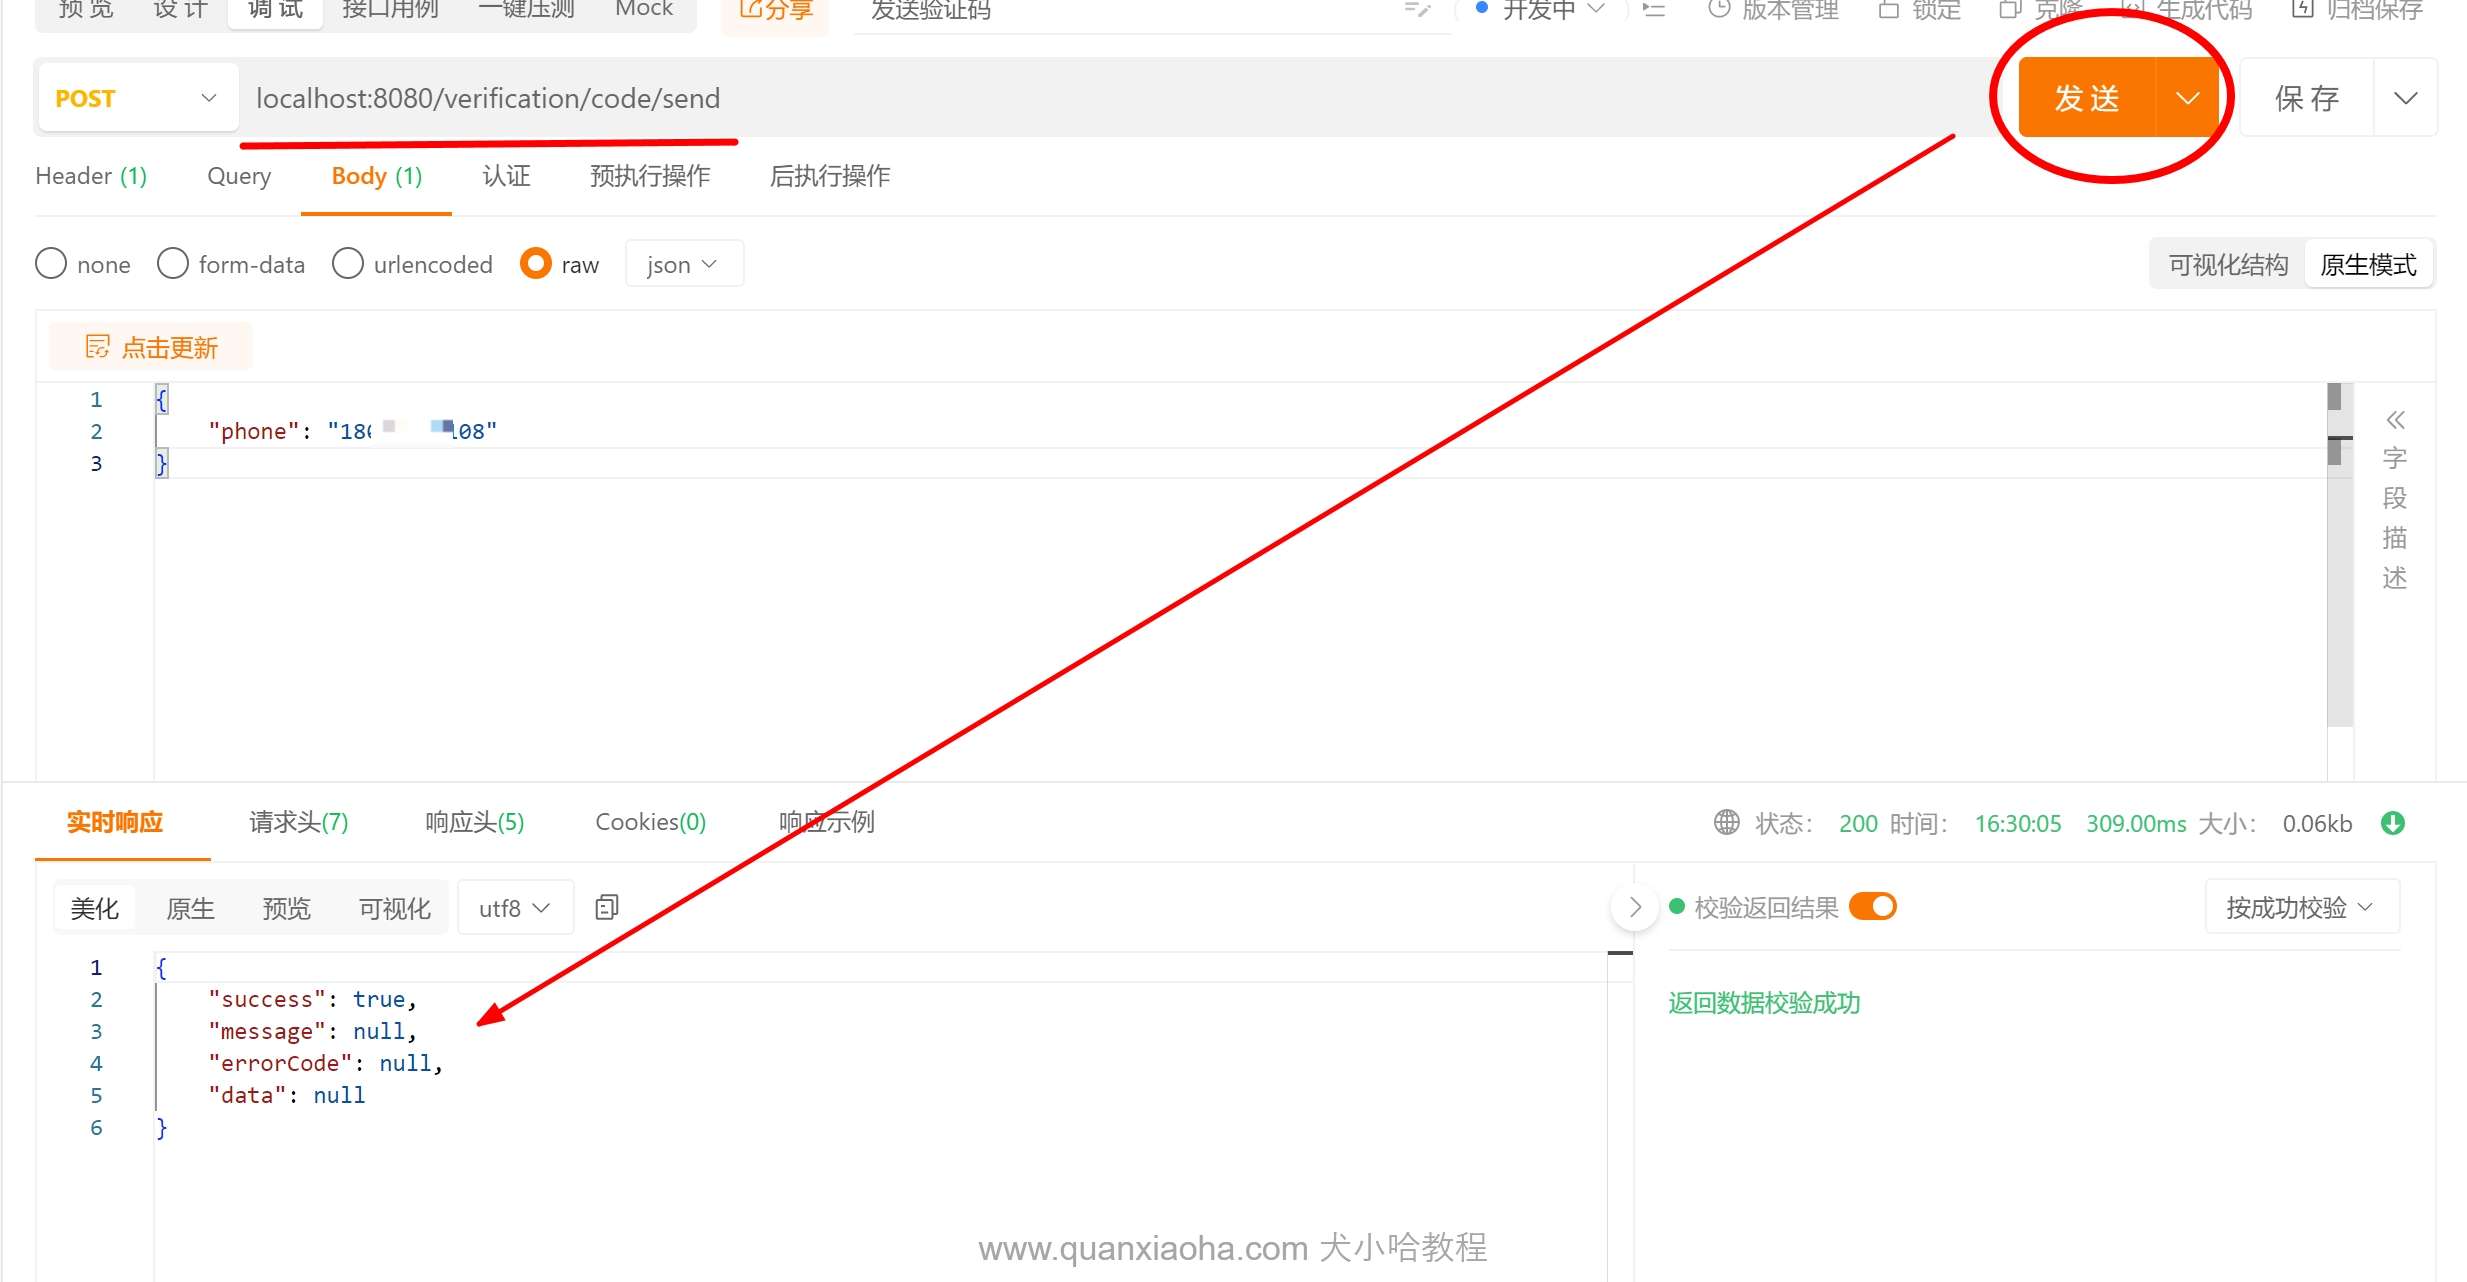
如上图所示,服务端响参成功,查看一下控制台日志,看看有无报错的情况。可以看到一切正常,控制台打印了发送的验证码:
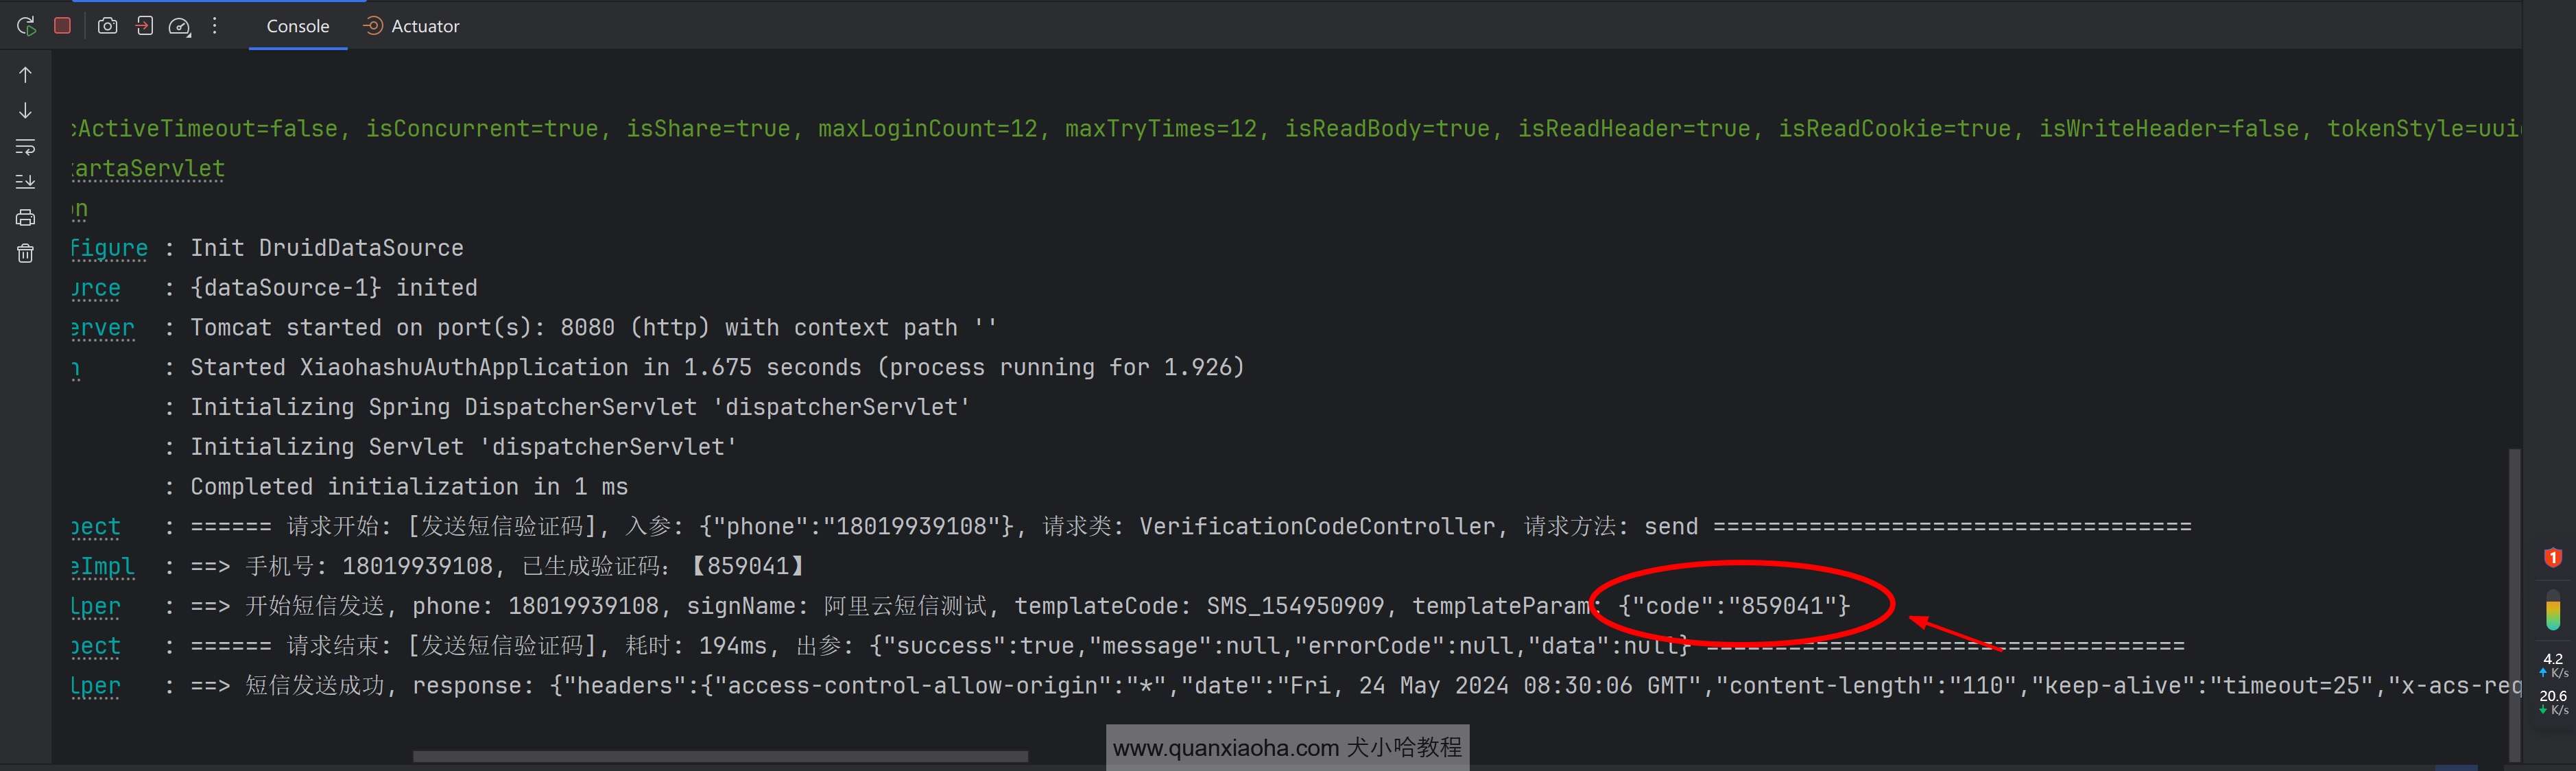
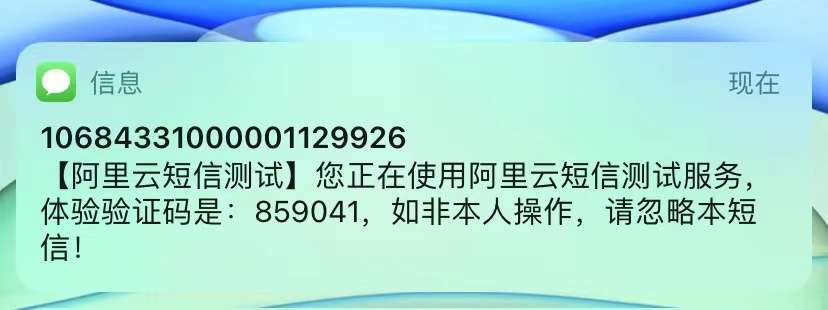
不出意外,这会你的手机就会收到一条信息,正是阿里云后台配置的测试模板的内容,验证码和控制台中打印的一致:859041 。
至此,集成阿里云短信服务,并异步发送短信的功能就搞定啦~